Showing posts with label gift. Show all posts

Thursday, February 25, 2016

How to get the Best baby footprint!


I don't know about you, but I love to make crafts!  Now that I have children, I love to make crafts that involved them!  However, that can get a bit messy!!  The first time I tried to paint my daughter's feet to make a footprint craft - oh my!  There was paint all over her, me, the towel I had put down and the paper I was trying to simply get one footprint on!  It was a mess!!

After a few trial and error attempts I have finally found the best way to capture those sweet little footprints - even on the wiggliest of my babies!


I prefer to use the washable paint! It cleans up so easily!!  I can use baby wipes, a rag, or just dip those precious little feet in the sink (which is definitely what my children prefer!)!!


The Bumbo seat has been the best thing I have used for feet painting!  It keeps their little legs pointed out, and keeps their feet from touching the floor (or anything else)!   


Then, I cover that sweet little foot with paint!  Thankfully my babies laugh at this part.  In teaching I have had some children who could not stand to have paint on their feet or hands - so we settled for tracing their feet/hands! 


To capture the footprint on paper I use a hard clipboard.  Simply place your paper on the clipboard and carefully press baby's foot against the paper.  The tricky part for me seems to be getting the toes (you can see a smeared toe in the picture).  I have found that if I start at the heel and roll the foot onto the paper pressing the toes in last I get the best footprint!

I hope this helps you as you create masterpieces with your babies!!


Wednesday, October 1, 2014

Frilly Scarf Tutorial

First of all, I have tried to write this blog several times...every time I sit down to type someone needs me! :)  It is wonderful to be a needed wife and Mom though!!

I'm sure you have seen the 'frilly' scarves that became quite popular last year.  I always wanted to make one, but the price per skein of the yarn was more than I was willing to pay... I can be rather cheap sometimes! :)

Not to long ago I found the yarn on clearance!!!  Yay!  So, I purchased several skeins (with intentions to make one for myself and a few for gifts or to sell).  Then, they sat in my craft closet for several months.  Sadly, I had to take a break from crocheting during the second half of my pregnancy.  My fingers would go numb (from slight swelling in my hands and wrists) if I did to much...since grading papers and typing lesson plans was what I was getting paid to do, I had to put those things ahead of the fun stuff!

Now, I am finally back to crocheting and crafting and I am loving it!!!  I certainly missed it!  I finally sat down to make the 'frilly' scarves and oh my goodness!  They were so much fun to make!  It does not take much time to make them at all! I had all of mine made in two afternoon nap-times! (I now measure thins by nap-times!)

I looked at several tutorials (I am a visual/hands on learner) and I still had a couple questions.  So, after I figured it out I  took a few pictures of my own to share with you!

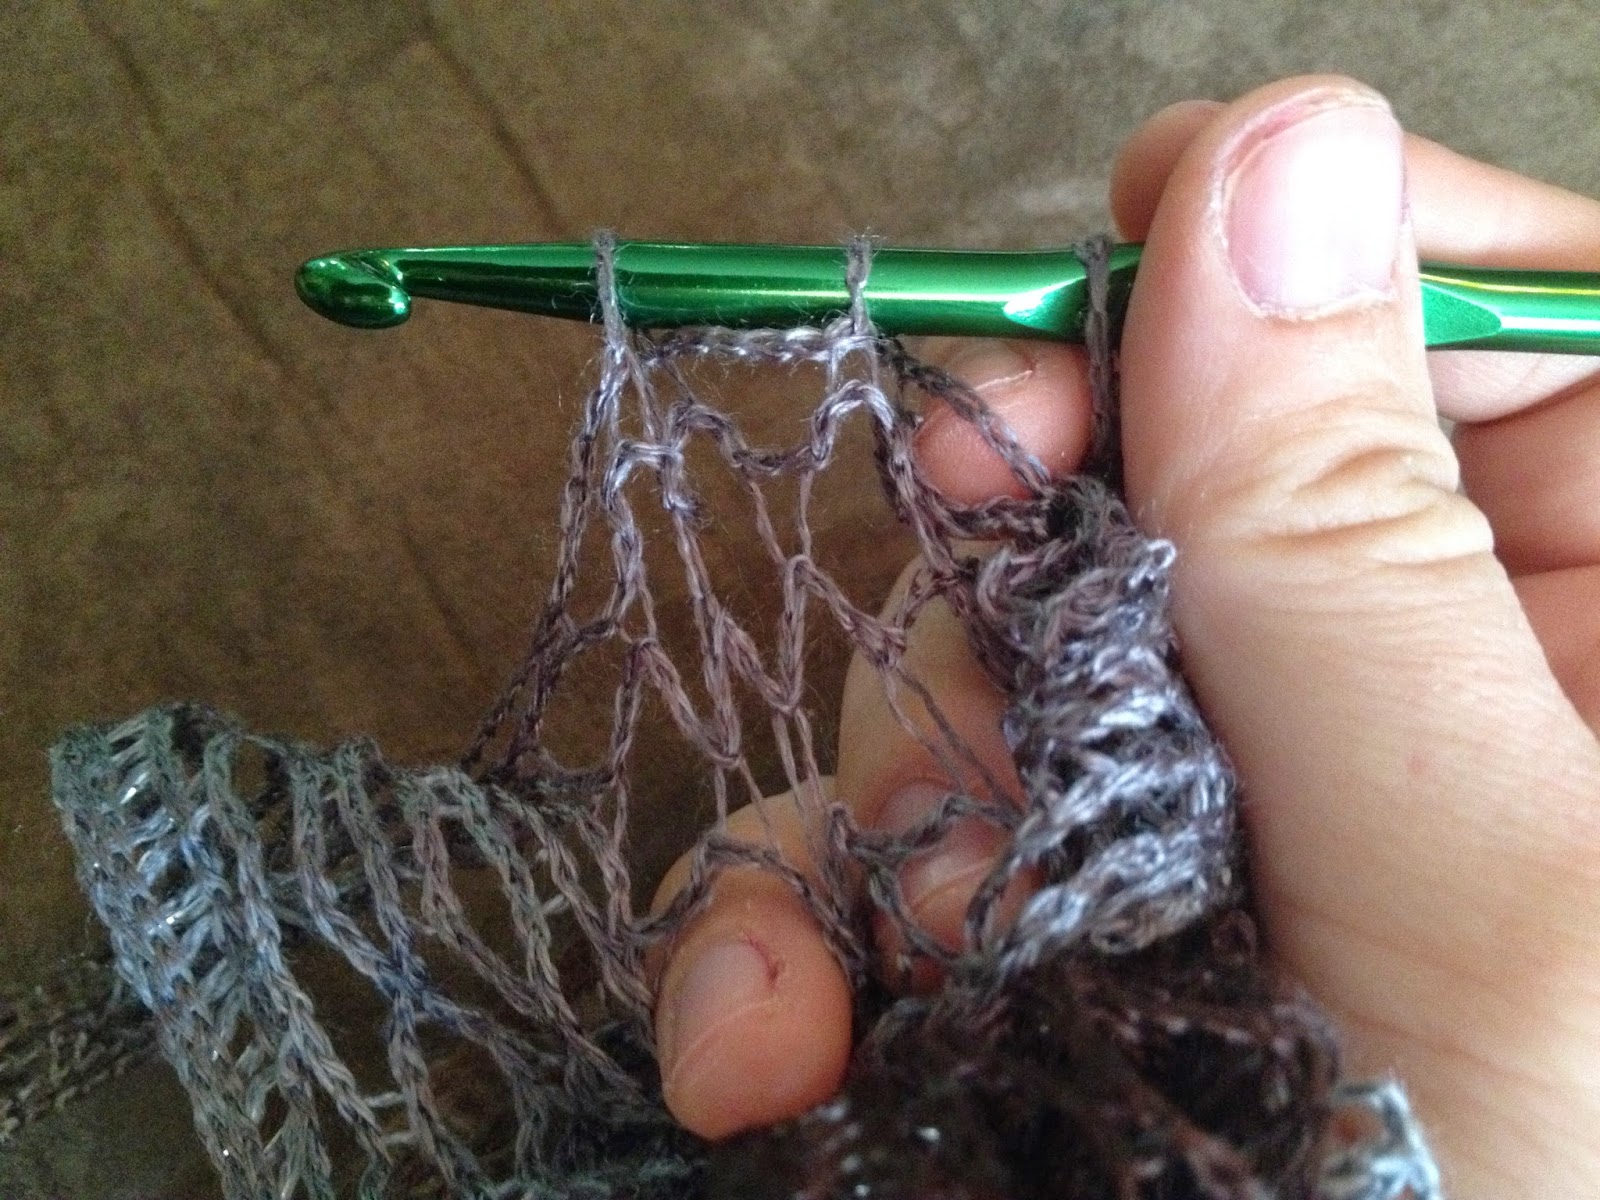
I used a size 'h'crochet hook.  If you spread the first part of the yarn out, you will notice that the two sides are different. You will want to work in the side that is more open...has holes for you to work in.


You are going to run your crochet hook through every other hole/space until you have cast on 10.   In the picture below you can see my crochet hook going through every other space.


After you have cast on 10, you will gather all except the one closest to the hook, and pull the single strand through the group.


Stitch markers were suggested in at least one of the tutorials I looked at, but I chose not to use them, and had no problem.  I believe they were suggested so that the whole scarf would not unravel or you would not lose your place if you had a mishap and dropped the stitches you were currently working on.

Now, I do not claim to be a super knowledgeable crafter/crocheter.  So, if something I have said does not make sense, please comment below or message me and I will do my best to help you out!  

Enjoy your new 'frilly' scarf!!!

Saturday, July 28, 2012

Pinterest Project of the Day - Day 15

Amidst my time with family here in North Carolina I found time to work on a project for today!!  It has been a full day!  I did the first part of the project this morning, then we went to visit some family, ate lunch at Hardees, and spent some time in the pool!!  So, this afternoon I was able to finish my project for the most part.  I did have to make a stop at Wal-Mart to pick up the final detail!  I recently found a simple crochet pattern for a coffee cup cozy on Pinterest.  So, I figured that would be rather simple to make with the partial skein of yarn I brought with me!  The pattern recommends using cotton yarn, but I had acrylic and it worked just fine!!


If you are interested in making one of these, you can find the pattern at Ravelry for free!  Or, if you would like to purchase one, please check out my Etsy shop!!  As with my other products, this can be made in custom colors, just message me for details!

Thursday, July 26, 2012

Pinterest Project of the Day - Day 13

Yesterday I had a friend ask about a project that I had pinned and had not yet completed.  So, today I worked on that project.  It took me a little while to get it the way I wanted it.  The project is a crochet flower.  The pattern is very simple, but because of that simplicity, lacking details.  I am a person who likes to know the details....so, it took a few tries, but I finally came up with a crochet flower that I think is acceptable!  The original pattern shows a cute button as the center of the flower, however I don't have any buttons that will work, so I suppose I will just have to go Hobby Lobby and get some!! My friend wants to use this to make a hair clip for her daughter - which I think will be adorable!


If you are interested in the patter it can be found on my Crochet-Knit Board on Pinterest.  Or, if you would like to purchase one please check out my Etsy Shop for more information - as with the other projects this can be made in custom colors, just message me and let me know!


********************************UPDATE*************************************

Here are some of the haribows that I have made using this flower!!  If you are interested in purchasing please check out my Etsy store, or message me - these can be made in custom colors!


Monday, July 16, 2012

Pinterest Project of the Day - Day 7

I didn't actually do this project today.  I am actually away from home and am in Memphis at the National Association of Free Will Baptist.  Since it is quite difficult to travel with all my favorite crafting supplies, I thought I would post about a project I have already completed...and actually I have done this project many times. It makes a great gift and every one who has received this has been very grateful! :)  There are many different patterns you can use, either crochet or knit and these are the most useful things you will ever make!!  I have pinned many patterns on my crochet/knit board on Pinterest - the one below I actually found in a book I had bought years ago...the main thing is that you use cotton yarn!   I have found that it is cheapest at Wal-Mart unless you use a 40% coupon at one of the crafting stores like Hobby Lobby or JoAnn!

I am actually talking with a local shop owner about putting some of these in her store on consignment, as well as perhaps some scarves or other hand made items....so, all prayers are appreciated! :)

Also, if you don't want to make your own...check out my shot at http://www.etsy.com/shop/SimplySweetbyCori?ref=si_shop!!  You can even request custom colors.  Enter the coupon code 'Project10' for a 10% discount!


Saturday, July 7, 2012

Pinterest Project of the Day - Day 1

I have pinned so many amazing and interesting things on Pinterest, but have not followed through on doing many of them.  Therefore, I am going to try to go through and do as many as possible!!  I thought it would be fun to post about how each project went as I did them.  Today, I made my first diaper cake.  I have seen many diaper cakes as various showers and such, but I have not ever made one.  I wanted mine to be a little different.   I had noticed at showers there was always a cake and a diaper cake.  So, I thought I would try to combine the two.  (I also thought it might be a cute marketing idea for Simply Sweet ~ by Cori www.simplysweetbycori.blogspot.com)  I checked out pinterest for some diaper cake ideas and there were so many cute ones!  Since this was my first I didn't do anything to terribly elaborate.  I simply made a large round cake and then made two layers of diapers for the topper.  I did not plan ahead very well and had to ask my husband to help me.  I really needed more rubber bands than I had on hand.  I needed to rubber band the center, then wrap the diapers around it and rubber band that...but my husband had to hold diapers in place until I could rubber band them! The cake turned out very well!  Hopefully now that I have the basics down I can make one a little more fun/fancy next time!