Showing posts with label fall. Show all posts

Wednesday, October 1, 2014

Frilly Scarf Tutorial

First of all, I have tried to write this blog several times...every time I sit down to type someone needs me! :)  It is wonderful to be a needed wife and Mom though!!

I'm sure you have seen the 'frilly' scarves that became quite popular last year.  I always wanted to make one, but the price per skein of the yarn was more than I was willing to pay... I can be rather cheap sometimes! :)

Not to long ago I found the yarn on clearance!!!  Yay!  So, I purchased several skeins (with intentions to make one for myself and a few for gifts or to sell).  Then, they sat in my craft closet for several months.  Sadly, I had to take a break from crocheting during the second half of my pregnancy.  My fingers would go numb (from slight swelling in my hands and wrists) if I did to much...since grading papers and typing lesson plans was what I was getting paid to do, I had to put those things ahead of the fun stuff!

Now, I am finally back to crocheting and crafting and I am loving it!!!  I certainly missed it!  I finally sat down to make the 'frilly' scarves and oh my goodness!  They were so much fun to make!  It does not take much time to make them at all! I had all of mine made in two afternoon nap-times! (I now measure thins by nap-times!)

I looked at several tutorials (I am a visual/hands on learner) and I still had a couple questions.  So, after I figured it out I  took a few pictures of my own to share with you!

I used a size 'h'crochet hook.  If you spread the first part of the yarn out, you will notice that the two sides are different. You will want to work in the side that is more open...has holes for you to work in.


You are going to run your crochet hook through every other hole/space until you have cast on 10.   In the picture below you can see my crochet hook going through every other space.
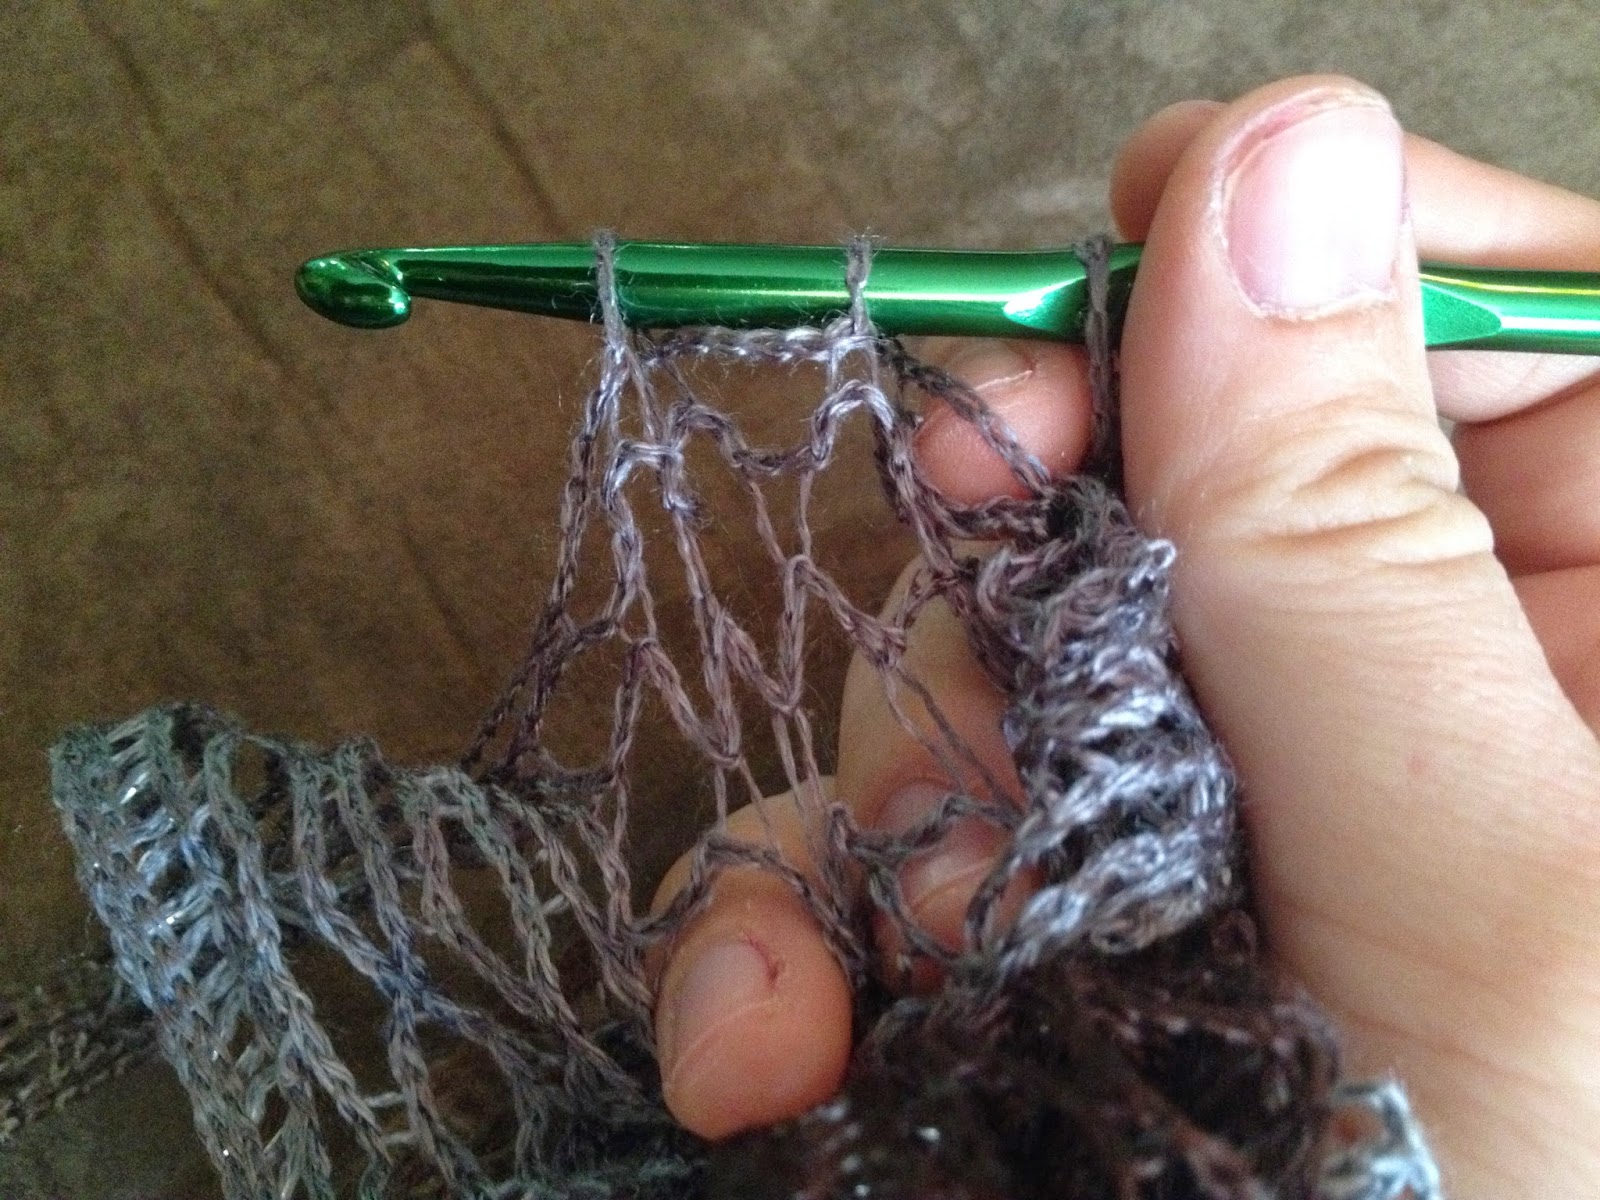

After you have cast on 10, you will gather all except the one closest to the hook, and pull the single strand through the group.


Stitch markers were suggested in at least one of the tutorials I looked at, but I chose not to use them, and had no problem.  I believe they were suggested so that the whole scarf would not unravel or you would not lose your place if you had a mishap and dropped the stitches you were currently working on.

Now, I do not claim to be a super knowledgeable crafter/crocheter.  So, if something I have said does not make sense, please comment below or message me and I will do my best to help you out!  

Enjoy your new 'frilly' scarf!!!

Thursday, October 11, 2012

'Mock' Apple Pie...

Some of you have certainly heard of Mock Apple Pie (maybe even from me), and some of you have no idea what this is all about.  I'm not sure when I first heard of Mock Apple Pie, but I have liked it ever since.  I choose to like or dislike food based not only on how it tastes, but also on its texture.  Because of that, I have never liked cooked apples in any form.  I have tried them baked on their own, and in a pie...I just can't do it! The texture is just not right.  I also don't really like Apple sauce.  So, when I found this Mock Apple Pie, I had to try it!  My Grandmother and Mom said the recipe was from the depression era when Apples were hard to come by.  I researched this and found that the Ritz cracker version was from that era.  However, years before that when people would travel they would use soda crackers, or some other type cracker to make this pie.  Then, when the Ritz company began, their crackers were much more suited to this recipe.  So, they marketed the recipe on their box for years!  Since I am enjoying time at home this week (FALL BREAK!!) I thought I would do a little baking.  And, what better to bake in the fall than a delicious smelling Apple pie! 

You will need:

Pastry for 2 Deep Dish crust             2 c. water
36 (approx.) Ritz Crackers                2 c. sugar
2 tsp Cream of Tartar                        Butter
2 Tbs Lemon Juice                            Cinnamon


Spread one crust into a Deep dish pie plate (be sure it is a deep dish - this recipe will overflow a regular pie plate - trust me!).  Coarsely crumble approximately 36 Ritz Crackers (about a sleeve and a third).


In a small sauce pan, combine water, sugar, and cream of tartar.  Bring the mixture to a boil and let boil softly for 15 minutes.  After the 15 minutes, add Lemon Juice and remove from heat to cool.  After the mixture has cooled (to about room temperature) pour over the crackers in the pie plate.  Add pats of butter and sprinkle with cinnamon (use as much of both as you like).  Cover with the top crust.  I chose to decorate my top crust, but all you need to do is cut a few slits in the crust to allow the steam out.


Bake at 425 F for approximately 30-35 minutes or until crust is golden brown. 


Doesn't it look yummy!! :)  It is best served warm and with a scoop of ice cream!  Of course, I was out of ice cream....poor planning!  However, it is still quite delicious!

 
Let me know what you think of this recipe and how your pie turns out!  It is definitely fun to serve it without telling people that there are no apples...although, some people say the texture is different...I don't know! :)

Tuesday, October 9, 2012

The Fire Pit...

For awhile now we have been wanting to put a fire pit in our backyard. When Stephen bought the house a few years ago, he bought it from a lady that had quite a variety of 'un-killable' plants in the yard... There was a circular garden in the exact center of the backyard, and we could not do anything to kill those plants!! So, my very own personal Mountain Man (I swear, he could be on that show...if we lived in the mountains) dug up all the plants! After that, we had a nice hole in the yard...so, what better time to construct a fire pit!  


Since I am the OCD person in the house, I got the job of placing each stone and being sure it was level...this was honestly the most time consuming part of the job...and honestly, it might could have been done faster, but, I had to make it perfect! :)


Since our back yard is slanted, we had to do a little extra digging on one side so that the fire pit itself would not be slanted!

 
There's my Mountian Man, waiting patiently for me to tell him where to dig, or when I need another stone!  He even smiled and said I was allowed to use his picture! Isn't he the greatest!! :)


And of course, since the truck got put in the back yard, and the doors were open, Cooper thought it was an invitation to go for a ride.  He literally stayed sitting in the truck the whole time we were working (the doors were open).   I guess he was the supervisor! 


We had enough stones to make two and half rounds (about 18 blocks per round).  So, we had to run back to Lowes to get a few more stones (and since Cooper was already in the truck he got to go for a ride!). ***Special note - these garden stones have gone up in price!  The first time I bought a load they were between $1.15-$1.30 each.  When we went back to get 10 more...they had gone up to $1.91 each...apparently Lowe's figured people would be making fire pits and there would be a demand.***
 
I'm not sure if you can tell, but we put a couple bags of sand in the bottom.  If you buy a fire pit kit (about $200 at Lowe's - we made this, larger, pit for about $75-$80) it will come with sand for the bottom...the guy told me why and I believe it had something to do with rain and mud, but I don't guarantee that. 


And , here is the fire master Mountain Man hiself! I cannot tell you how many evenings will now be spent in the back yard!!  WE are both so excited about this project!  It was not overly expensive, it was not difficult to assemble, and it is a wonderful addition to our yard!  

Monday, September 24, 2012

S'mores...

So, I don't know about you, but I love S'mores....they always make me think of Girl Scout camp.  A bunch of us girls and a few of our moms (including my wonderful Mom) went on a camping trip.  We had a little cabin with a kitchen and a lot of sleeping bags!  Our cabin was right beside a little creek and there was a fire pit behind the cabin.  One evening we made S'mores and they were wonderful!  There are so many other times I have made S'mores also, but this memory was always a fond one! 

While S'mores are delicious, they are not always easy to fix...I hate to fire up the grill for one S'more!  :)  My mother use to make a S'more's snack mix with Golden Grahams, Marshmallows, and Chocolate Chips...but recently I ran across a recipe for a Rice Krispie treat type S'more!  So, I tried it!! 

DELICIOUS!
 
 
I couldn't resist sampling the warm gooey goodness as I was making these!!
 
 
You need:
5 Tb butter
1 bag mini marshmallows
1 (12 oz) box of Golden Grahams
1 bag chocolate chips (chilled in freezer)
splash of vanilla (optional)
13x9 cake pan (sprayed with cooking spray)
 
Melt the butter in a saucepan.  Add marshmallows.  When they are almost melted you can add the vanilla if you would like to.  Then add the Golden Grahams and Chocolate Chips.  Pour into a pan to set up, cut and enjoy!
 
I probably would use a larger pan than I used this time....they were a little thick for my personal preferences.  However, they were wonderful!!
 
Enjoy!
 

Sunday, September 23, 2012

Taco Soup...

Today I made the first soup of the season...and it was wonderful!!!  Tonight was a perfect night for a bowl of soup!  We had a great morning at church, then came home relaxed, put soup on the stove, and then this evening we sat down to eat that soup and watch some football!!

This is a recipe that I use Deer meat for, but it can be made with hamburger or ground turkey, or without meat!  I must give recipe credit to my Mother-in-law.  She gave this to me after I found out it was one of my husband's favorites.  I have also heard of people adding cabbage, but...I don't.  It can be made within 30 minutes and lasts my family (myself and my amazing husband) about a week - one night of dinner and then lunches a couple/few days each.


Taco Soup:
1 can kidney beans
1 can black beans
2 cans whole kernel corn
1large can crushed tomatoes
1 package taco seasoning **I use homemade Taco Seasoning
1 package ranch seasoning
1 lb ground meat (browned)

Combine all ingredients (don't drain the beans, just open the can and dump) in pot and heat through!  Serve with corn chips and shredded cheese!  Although it can be made quickly, if I have time, I like to put it on low heat and let it cook slowly through the evening....makes the house smell delicious!!

Friday, July 20, 2012

Pinterest Project of the Day - Day 8

Today I decided to try to make the 'One Hour Scarf' that I pinned awhile back.  It takes four strands of yarn and a 10mm crochet hook.   I'm not exactly sure if I used the right size crochet hook because my biggest one does not have a size printed on it, but it worked great!  I used four fall-like colors this time, to try the pattern out, but next time I am thinking of using two colors, two strands of each color. I really liked how this turned out.  I do have to admit it took me two days to complete my 'One Hour Scarf' - crazy right?  But, I started it, and worked off and on amidst laundry and housework. Then, left for dinner, planning to come home and finish, but got caught in the storm and didn't make it home until after 11:00, so I finished when I got up this morning.  I do think if I were to sit down and work continuously that I could complete this scarf in an hour or an hour and a half at the most!  I also did not modify this pattern at all!  The pattern can be found at: http://laughingpurplegoldfish.blogspot.com/2008/03/one-hour-scarf.html.  If you try it, let me know how it goes!!

This is my finished scarf and the crochet hood I used.  I got this crochet hook at Wal-Mart for a very decent price!