Monday, May 22, 2017

Is VIPKID for YOU:?


I have heard quite a lot about VIPKID.  I have heard it is a scam, they won't pay you, and I have also heard wonderful things. I'm sure you may have heard many different things as well!  So, I want to just take a minute and tell you what I LOVE about VIPKID!

I have been a stay at home Mom for the past three years and I absolutely love it!  However, I did not love that my husband was having to work so many hours overtime or at his second job.  We needed the money, but we needed him around also!

I was scrolling facebook one day and a friend had shared a post about VIPKID.  I thought about it...and decided to ask her for more information.  Then, I talked with my husband about it -- he was skeptical -- said a prayer, and decided to give it a go!  I mean, what's the worst that could happen?

So, I applied, and my application was accepted!! Yay!!  Then, I had an interview online!  YIKES!  It had been over 5 years since I had a job interview, and never with someone in China over Skype!  So, I made sure it was a night my husband was home to intercept any small people in protest of bedtime, I set up my computer and began my interview!  I forget the name of the lady I interviewed with, but she was SO nice.   It was a great interview!  We did a mini-lesson.  She noted my phonetic proficiency (I do love phonics).  and I was then scheduled for a 'Mock Class'.

I did two 'Mock' Classes.  Each with a current teacher located here in the USA.  Both teachers were great (for which I am thankful, I have heard of a few, rare, bad experiences).  Then, it was time to fill out contract and banking info.

So, I was a little nervous....  I mean my bank account info is kind of a big deal.  :)  Let me assure you here - you have NOTHING to worry about!

I currently teach about 3 hours a day, 6 days a week.  I am on my second contract with VIPKID and I have not had a single issue!  I have received my correct pay every month on time.

I teach Monday-Saturday 4:30am-7:30am.  That is the time that works for me, because my children are asleep.  The beauty of VIPKID is that each teacher can set their own schedule for whatever works for them!!  You can work one day a week, or you can work every day!  You can work night time hours, or morning hours!

Base pay begins at $7-$9/class (25 minutes).  If you are on time and teach the whole lesson, you also earn an extra $2/class.  That is approximately $20/hour!!!

VIPKID also LOVES their teachers!  They are often running promotions to allow teachers to earn bonuses!

And, the PROVIDE the lessons for you!  In the mini clips below you can see a sample of one of my lessons!  -- Usually you can see the student, but since I am sharing this on Social Media I chose video clips where the students camera was off so as to respect their privacy.


You simply log in and teach!  They do ask that you look at the lesson ahead of time, so that you are prepared.  Also, any props you use (flashcards, toys, etc...) you will provide yourself.  I mostly use toys from my kids toy box!!


Above is a picture of a blank schedule.  The orange boxes are the times that are 'most likely' to be booked.  However, any time shown on the schedule is available for you to teach!  You simply select the days and times you want to teach.

So, what are the requirements??  They only require that you have a Bachelor's Degree (in ANY field), some experience with children, and that you can pass a background check!!

I hope that this has helped you understand more about VIPKID!  If you have any further questions,  please feel free to contact me!

When you are ready to apply, simply do so here!!

~Cori

Saturday, February 27, 2016

DIY Applesauce/Babyfood

I began making applesauce as a school project for my first grade students.  I had been looking for a fun craft or snack for my class for Johnny Appleseed Day.  While I was searching I came across a recipe for home made applesauce.  I personally don't care for applesauce - something about the texture.  But, my kids all loved it!  It was a big hit with them!  So, every year for Johnny Appleseed day we would make applesauce!  It was a great lesson that they never knew they were learning!

I am currently a stay at home, taking care of my two precious children, so I am not making applesauce once a year.  Instead I am making it at least once a month!  My children love it and think it is a great treat!  I do try to buy a lot of apples when I find a good deal and make my applesauce ahead.

I start with my wonderful Pampered Chef Apple Wedger!


This nice little tool makes the job so much faster and easier!  Simply press down, then peel each little section!


I usually cut each section in half, but that is not a must.  The smaller the pieces, the more quickly the applesauce will cook.  So the size of the apple pieces is totally up to you.  I also add about 1/4 c. water to the crock-pot.  You can add cinnamon if you want - I always did, until we discovered my daughter has a mild cinnamon allergy.


When I made this in the classroom I cut my apples into very small pieces to be sure my applesauce was cooked in time for the students to sample it! When I make it at home I don't worry about the size of the pieces.  I just toss them in the crock pot and turn it on high!


Each time I walk through the kitchen I try to just give the apples a quick stir.  This just makes sure they continue to cook evenly and also let me know when they are done!  (It has also let me know I forgot to plug in the crock-pot...)


If I were making this for my toddler or older children, I would be finished after mashing the apples with a spoon.  However, when I make it for my 6 month old, I use a blender to puree the applesauce.  Then, I spoon it into ice cube trays to freeze and use as needed!

Good Luck and Enjoy!

Thursday, February 25, 2016

How to get the Best baby footprint!


I don't know about you, but I love to make crafts!  Now that I have children, I love to make crafts that involved them!  However, that can get a bit messy!!  The first time I tried to paint my daughter's feet to make a footprint craft - oh my!  There was paint all over her, me, the towel I had put down and the paper I was trying to simply get one footprint on!  It was a mess!!

After a few trial and error attempts I have finally found the best way to capture those sweet little footprints - even on the wiggliest of my babies!


I prefer to use the washable paint! It cleans up so easily!!  I can use baby wipes, a rag, or just dip those precious little feet in the sink (which is definitely what my children prefer!)!!


The Bumbo seat has been the best thing I have used for feet painting!  It keeps their little legs pointed out, and keeps their feet from touching the floor (or anything else)!   


Then, I cover that sweet little foot with paint!  Thankfully my babies laugh at this part.  In teaching I have had some children who could not stand to have paint on their feet or hands - so we settled for tracing their feet/hands! 


To capture the footprint on paper I use a hard clipboard.  Simply place your paper on the clipboard and carefully press baby's foot against the paper.  The tricky part for me seems to be getting the toes (you can see a smeared toe in the picture).  I have found that if I start at the heel and roll the foot onto the paper pressing the toes in last I get the best footprint!

I hope this helps you as you create masterpieces with your babies!!


Thursday, December 10, 2015


I am all about being prepared for anything!  Which means my diaper bag has got to be organized, or I will never find anything when I need it.  I carried the same diaper bag for the past two years, and have just had to find a new one in the past few months!  There are five main things I was looking for when I chose my diaper bag.  I wanted to be sure I made the right decision because I plan to be carrying this one for at least a couple  years also!


SIZE - Will it fit where I want it to?
          I did love my old diaper bag, but it would not fit in the basket under my stroller!  I had no
          problem with it elsewhere, but not fitting in the stroller was definitely a problem!  So, think
         about where you will be and what type spaces your bag will need to fit.  I usually need mine to
          fit in the grocery cart, stroller, or the floor board of the car.

POCKETS - Are there enough pockets to hold what I need?
          Since I am all about being prepared I really want plenty of pockets.  The pockets allow me to
          organize my things so that I can find them quickly when I need them.  I have extra pacis in
          one pocket, chapstick and candy (for Mom) in one pocket.  One of the front/back pockets is 
          the perfect size for a sippy cup or bottle!  The front/back pockets are also the perfect size for a
          canister of 'puff' cereal.  (While neither of my children eat those, I do re-use the container for
          cheerios!!).

COLORS - Will this color/pattern be something I can use in the future?
          When I had my first child I tried to emphasize to people that I still wanted gender neutral
          items.  I did not want to have to purchase everything new for the second child if we had a
          different gender than the first.  Some people do want very gender specific bags.  This would
          also include any monogram on the bag.  My bag is brown and has our last name on it.  We
          know it is ours, but it can be used for either child (or both). 

DURABILITY - Is this something that I will not have to worry about tearing up?
          I don't like spending money.  I prefer to save it.  So, when I do spend money I want to get the
          most for it.  I have had the bag I am now carrying for 4 years before I chose to use it for my 
          diaper bag.  I have a second bag (different pattern) that I carried back and forth to school when
          I taught and it is still in great condition.  This is a bag that I will be able to carry for quite
          awhile!

SPACE - Is there enough space to hold everything I need?
          Having all of the above does no good if your bag won't hold the necessities.  Think about what 
          you plan to carry in your diaper bag.  (I will post about what I carry in mine soon!)   Lay it all
          out so that you can have an approximate idea of how much space you will need inside your
          bag.  Every parent is different, so your bag may need to be larger or smaller than a friend or
          than mine.  That is fine!  Decide what is best for you and your children!


I ended choosing a bag that I already had on hand.  It is the Organizing Utility Tote (with Zipper Top) from ThirtyOne.  Of course, when I got my bag they did not have the zipper top option...so...I may have to save my pennies and get a new one! :)  I have been carrying it for a month or so now and it is perfect!  I began carrying it just to get me through until I could find a diaper bag that I liked.  But, the longer I carried this bag, the more I liked it!!


What do you look for when you choose a diaper bag?  I would love to hear from you!

God Bless!

Friday, November 13, 2015


When we found out we were expecting our first child we knew we had to cut our expenses.  We had already discussed the fact that I had always wanted to be a stay at home mom.  My amazing husband fully supported me in that desire.  Also, after looking at childcare costs, it was actually better for me to stay at home and him to pick up a few extra hours of overtime.  Below are just a few of the ways that we managed to cut our monthly expenses:

1)  StraightTalk

We saved about $125 each month by using StraightTalk as opposed to other major cell providers.  We were able to use cell phones that we already had, and we actually have a better plan.  This is a step we were hesitant to take at first, but now we wish we had taken it sooner!  We have unlimited, talk, text, and data for a little less than $50 (per line) each month!  We have had NO problem with service, and the customer service is wonderful!!

2)  Home Phone

We had a home phone for several years, mainly for our alarm system.  However, we were able to pay a small fee and get our alarm system switched to cellular and connected to our cell phones.  This saved us about $30 per month.  The monthly alarm bill did go up a little, but the savings still outweigh the cost!

3) Cable TV/Antenna TV/Netflix

We had the nice package of all the good channels, plus a couple sports channels.  It seemed our bill just kept going up, even though our channel selection didn't.  So, we totally cut out the paid tv.  We purchased a $15 antenna at Wal-Mart and we watch Netflix.  Aside from missing the new HallMark movies (me) and the occasional football game/hunting show (my sweetheart) we really don't miss cable tv.  Netflix has a plethora of shows and movies, the kids have no clue anything has changed, and the money saved is wonderful!

4)  Meal Planning

Sometimes I can go a bit overboard and plan extravagant meals that require more expensive ingredients...but, as long as I plan ahead I am able to stay well within my grocery budget.  I also grocery shop every other week, as opposed to weekly trips to the grocery.  I limit my larger stores (SAMS) to every other month/every couple months depending on how long my stock of supplies lasts.

5)  Eating at Home

The more I can cook myself, the less money we spend.  Seriously, look at the receipt the next time you eat out.  How much money was just spend on a drink?  Do you know how much cheaper it is to drink the exact same thing at home?  Especially sweet tea!  Wow!  Not to mention if you eat in a 'sit down' restaurant and have to add a tip to the meal.  Buying the ingredients and putting them together myself saves quite a bit of money.  And now, thanks to Pinterest, you can get recipes for your favorite dish from your favorite restaurant!   When we do eat out, we look for places we have a coupon for, or that offer a 'Kid's eat free' night.

6)  Using Cash

I don't like to carry cash around.  I am terrible about getting to the bank/ATM to get out the cash I need for the week, BUT, when I remember to use my cash, it helps me not overspend.  I don't spend that much per week simply because I am home the majority of the week.  But, every once in a while a Sonic Happy Hour drink is necessary!  I have a set amount of money for my sweetheart and I for each pay period.  I also try to set aside a certain amount for gas.  Any spending money that is left over goes to a separate part of the wallet to be saved for a future splurge!

7)  Creating/Following a strict budget

Creating the budget wasn't to difficult...following it...Yikes!  I have learned that if I log into my bank account every day or every couple days it helps me follow my budget.  It only takes a couple minutes each morning, and I am better able to keep track of where the money is being spent and how much is left.


Even our best plans can turn into a train-wreck sometimes.  There have been times when we have totally strayed so far from the budget it wasn't even funny!  But, when you don't allow yourself extra room, you have to learn to stick with it.  Any extra money that is left in the budget goes either towards paying off a bill (hospital, car, house, etc...) or to savings.  Depending on the amount it may be split between bill pay/savings.

What do you do to stick to your budget?  I would love to hear back from you!

Thursday, November 12, 2015

Baked Parmesan Garlic Fries

I absolutely love to eat potatoes...almost any way they can be fixed! Growing up I always thought it was a treat to have 'home made french fries'.  My mom would peel and slice the potatoes and pull out the little Fry Daddy and fry them.  Oh my...they were delicious!!!  We eventually started baking them in the oven.  This is much easier in that we don't have to deal with hot oil - especially nice when you have babies running around!  Either way you cook them, they are delicious!!  I usually make mine with garlic and Parmesan, just for a little extra flavor,  However, you can make them with any flavor you desire, and the toppings are endless!!

I begin by peeling my potatoes.  If you wash yours thoroughly you can leave the peeling on if you prefer.  I then slice my potatoes to the desired thickness.  My husband prefers much thicker potatoes, similar to steak fries or potato wedges.  Once the potatoes are peeled and sliced I place them in a bowl.  I then lightly drizzle them with Olive Oil and add my seasonings.  I use Garlic Powder, Salt, Pepper, and Grated Parmesan.

Spread the potatoes evenly on a baking sheet/stone.


This is just a glance of the fun that happens around me when I am cooking! :)  


Bake the potatoes at 425F, for approximately 20 minutes. Time will vary depending on the thickness of the potatoes.


You can top with bacon, cheese, onions, peppers, or even just eat them like they are!  Enjoy!  Let me know your thoughts or suggestions! I love those comments! :)

Tuesday, November 10, 2015

My First Deer...

I have never had a problem eating or cooking deer meat.  So, when I married my wonderful mountain man, I was thrilled he enjoyed hunting and more than happy to use the meat from the deer he killed.  This has saved us a great deal of money in just the (almost) 5 years we have been married.  The past couple years though, we have become a one income family.  Which means I look for any way to save us money each month.  Although using the deer meat sounds totally free...it isn't.  Each year we have to purchase a hunting license, then each deer has to be processed ($55-$75 approx).  While that is still cheaper than purchasing meat at the grocery store (not to mention this meat has no preservatives, additives, or extra hormones) it was not always easy to find the extra money in that lump sum...


Well...I got to thinking...scary!  Why don't we do this ourselves?  We have family that does, it doesn't seem that difficult.  So, when my sweet husband called me that he had killed a deer, and to ask what I preferred that we do with it, I told him I really wanted us to try and process it ourselves.  He said, 'Are you sure?'  I said, absolutely!  We can do this!  Well, we did it!  We had a few hiccups though...

I had seen an electric meat grinder at a local store, so I planned on going out to buy that first thing in the morning.  For some crazy reason though, I decided to research that grinder before I went to the store...well, the reviews were not wonderful.  So, I tried to find other meat grinders in stock near us, that were affordable - guess what - NO LUCK!

So, we pulled out the hand grinder...oh my!!  I pray we never have to use that hand grinder again.  It served its purpose well, but hand grinding almost 40 lbs of meat was no picnic.  I didn't even do the majority of the grinding...I was packaging!  However, we DID process our own deer!  I am working on getting our electric grinder ordered ASAP!


Have you ever processed your own deer?  Do you have an electric meat grinder?  If so, what recommendations do you have?  I will be sure to update you on what we get and how it works!

Monday, November 9, 2015

Blogging...

So, in all honesty I never thought much about blogging...I always tell people I am not a grammar fanatic.  However, I find myself correcting people's facebook posts.  Seriously, I wish it would allow you to edit and fix other peoples grammar (although, some may say that about my grammar...)!  I also never considered myself a writer with much to say.  However, I stumbled into this very fun outlet for my busy busy mind, and I love it!!  I am not always the person who blogs on a regular basis.  In fact, you will find large gaps in my blogging (especially around the time of the birth of my children).  But, I do enjoy sitting down and putting my thoughts into words.

I don't see this as something that will make me rich.  Although, I wouldn't complain if it did! However, I have made a little bit of money by doing it!  I suppose I'm writing this to simply say, If you enjoy writing, you never know who will enjoy reading what you have to say about things, and hey, if you can make a couple dollars, then why not!   So, go write something and share it!!

Wednesday, May 13, 2015

New Laundry Detergent

I know that I have previously posted a recipe for laundry Detergent, but I have been given a new one that is SO easy!!! (I'm honestly not sure where the recipe originated...)  It works great!  My Mom made me two gallons when we moved because I had to wash everything that we stored.  I have just made myself another gallon and it was so simple!

You will need:

1/4 c. Borax
1/3 c. Super Washing Soda
2 Tbsp. Dawn
Water
Sturdy Gallon Container (for liquids)

I filled the container about 1/4 full of HOT (really hot) water.  Then I added the Borax and Washing Soda.  Swirl the container around until the powders are dissolved.  After the powders are dissolved add the 2 Tbsp. of Dawn, and then fill the container with water (temperature does not matter).

You're Done!  Wasn't that easy!!

Use this just as you would any other liquid detergent!  It has worked great on baby clothes, my clothes, my husbands work clothes and everything else I have needed to wash over the last month!

Let me know what you think!

Monday, May 11, 2015

Getting Settled

Well, for those who may not have know, we have moved!!  It was certainly an experience!  We put our house on the market and had a contract within a month.  We had prepared ourselves to wait much longer because several homes in our neighborhood had been slow to sell.  Since we were somewhat unprepared for the speed of the sell, we had not yet found a house to move into.  We looked every chance we had - when my husband and I were both off work.  But, the day came to move out and close and we were homeless!  Thankfully we were able to stay with family (my husbands parents) while we continued to look for a house.  We put all of our things in storage and packed our suitcases...

We finally found a house, and it was for sale by owner.   We were so excited!  It was a great house, closer to my family, and hubby's as well as being closer to hubby's work.  We started on the process of putting a contract on the house, got inspections and so on.  We got down to near time to close and kept hitting little hiccups...we were truly afraid we were going to have to start all over.  However, the Lord answered our many prayers and we were able to close on our house!  My wonderful Mom and I came over and began cleaning and lining cupboards immediately!  Then, moving day was here - and it was a little chaotic! But, all of our things were once again in the same place we were, and we had our own bed to sleep in!

Fast forward about a month and a half and now we are settled in (for the most part) and unpacked (for the most part).  Finally getting back into our routines and our way of life.  So...all of that being said - be on the lookout for more postings from me.  My mind is on craftiness and DIY overload!  I have SEVERAL projects all lined up to do and share!  I can't wait!

Tuesday, November 4, 2014

Rice Cereal Cookies

My daughter is loving those little rice cereal cookies that you can buy at your local grocery.  We buy ours from Wal-Mart.  However, even buying store brand they are about $2.50 per box and I just hate to spend that much!  So, I looked around for some recipes.  I found one from Wholesome Baby Food that I liked.  I, as always...., changed one thing in the recipe.

My recipe:

You can also use flavored baby cereal if you want. I made them plain, just because this was the first time I was trying the recipe.  Next time I may play around with some flavors.  The original recipe only used the rice cereal,but I thought I would try it with a mix, and it was a hit!  

Let me know if you try them and what you do differently!


Thursday, October 16, 2014

Cream of 'Whatever' Soup

I (as many of you) try to pinch pennies whenever possible, without losing quality.  I also love to use my crock pot...especially on days that I babysit.  Several of my crock pot recipes call of a can of cream soup.  While browsing Pinterest I found a recipe for a dry cream soup mix.  I have actually been planning to try it for awhile...but am just now getting around to it.  What can I say...life happens! The original recipe can be found 'here'.  There is also a second dry soup mix recipe I have pinned that I want to try when this one runs out.  I did make a couple minimal changes to the recipe!

You will need a container (that will seal well) to store your dry mix in.  I chose a large glass jar.  I also used a Sharpie marker to write the recipe and directions on my jar.  (If I need to use the jar for something else a little acetone will wipe that marker right off!)


The recipe is:
1 c. Non-fat dried milk
3/4 c. Cornstarch
1/4 c. Bullion
4 T. Dried Minced Onion
1 t. Basil
1/2 t. Thyme
1/2 t. Parsley
1 t. Pepper

I did learn something very new when making this recipe.  It may be something you all know, but it was new to me and I was excited! It truly is the little things that make me happy!  I did not know that you could buy bullion powder!  I have only ever purchased bullion in cubes.  This stuff is amazing!  I can use just a couple teaspoons when I make rice!  I love it!  If you don't want to purchase this item, you can crush up some cubes.  Although the bullion powder was very reasonably priced!

Also, I didn't have any minced onion, so I used Onion powder and it worked great! If I have something in my cabinet/pantry that will work I don't buy new!


To use the dry mix you add 1/3 c dry mix and 1/2 c water.  Then microwave for 30 seconds (or until it starts to thicken.  Just be careful, if you cook in longer increments it may get too thick, so check it often until you find the right time for your microwave!

Let me know what you think!!


Wednesday, October 1, 2014

Frilly Scarf Tutorial

First of all, I have tried to write this blog several times...every time I sit down to type someone needs me! :)  It is wonderful to be a needed wife and Mom though!!

I'm sure you have seen the 'frilly' scarves that became quite popular last year.  I always wanted to make one, but the price per skein of the yarn was more than I was willing to pay... I can be rather cheap sometimes! :)

Not to long ago I found the yarn on clearance!!!  Yay!  So, I purchased several skeins (with intentions to make one for myself and a few for gifts or to sell).  Then, they sat in my craft closet for several months.  Sadly, I had to take a break from crocheting during the second half of my pregnancy.  My fingers would go numb (from slight swelling in my hands and wrists) if I did to much...since grading papers and typing lesson plans was what I was getting paid to do, I had to put those things ahead of the fun stuff!

Now, I am finally back to crocheting and crafting and I am loving it!!!  I certainly missed it!  I finally sat down to make the 'frilly' scarves and oh my goodness!  They were so much fun to make!  It does not take much time to make them at all! I had all of mine made in two afternoon nap-times! (I now measure thins by nap-times!)

I looked at several tutorials (I am a visual/hands on learner) and I still had a couple questions.  So, after I figured it out I  took a few pictures of my own to share with you!

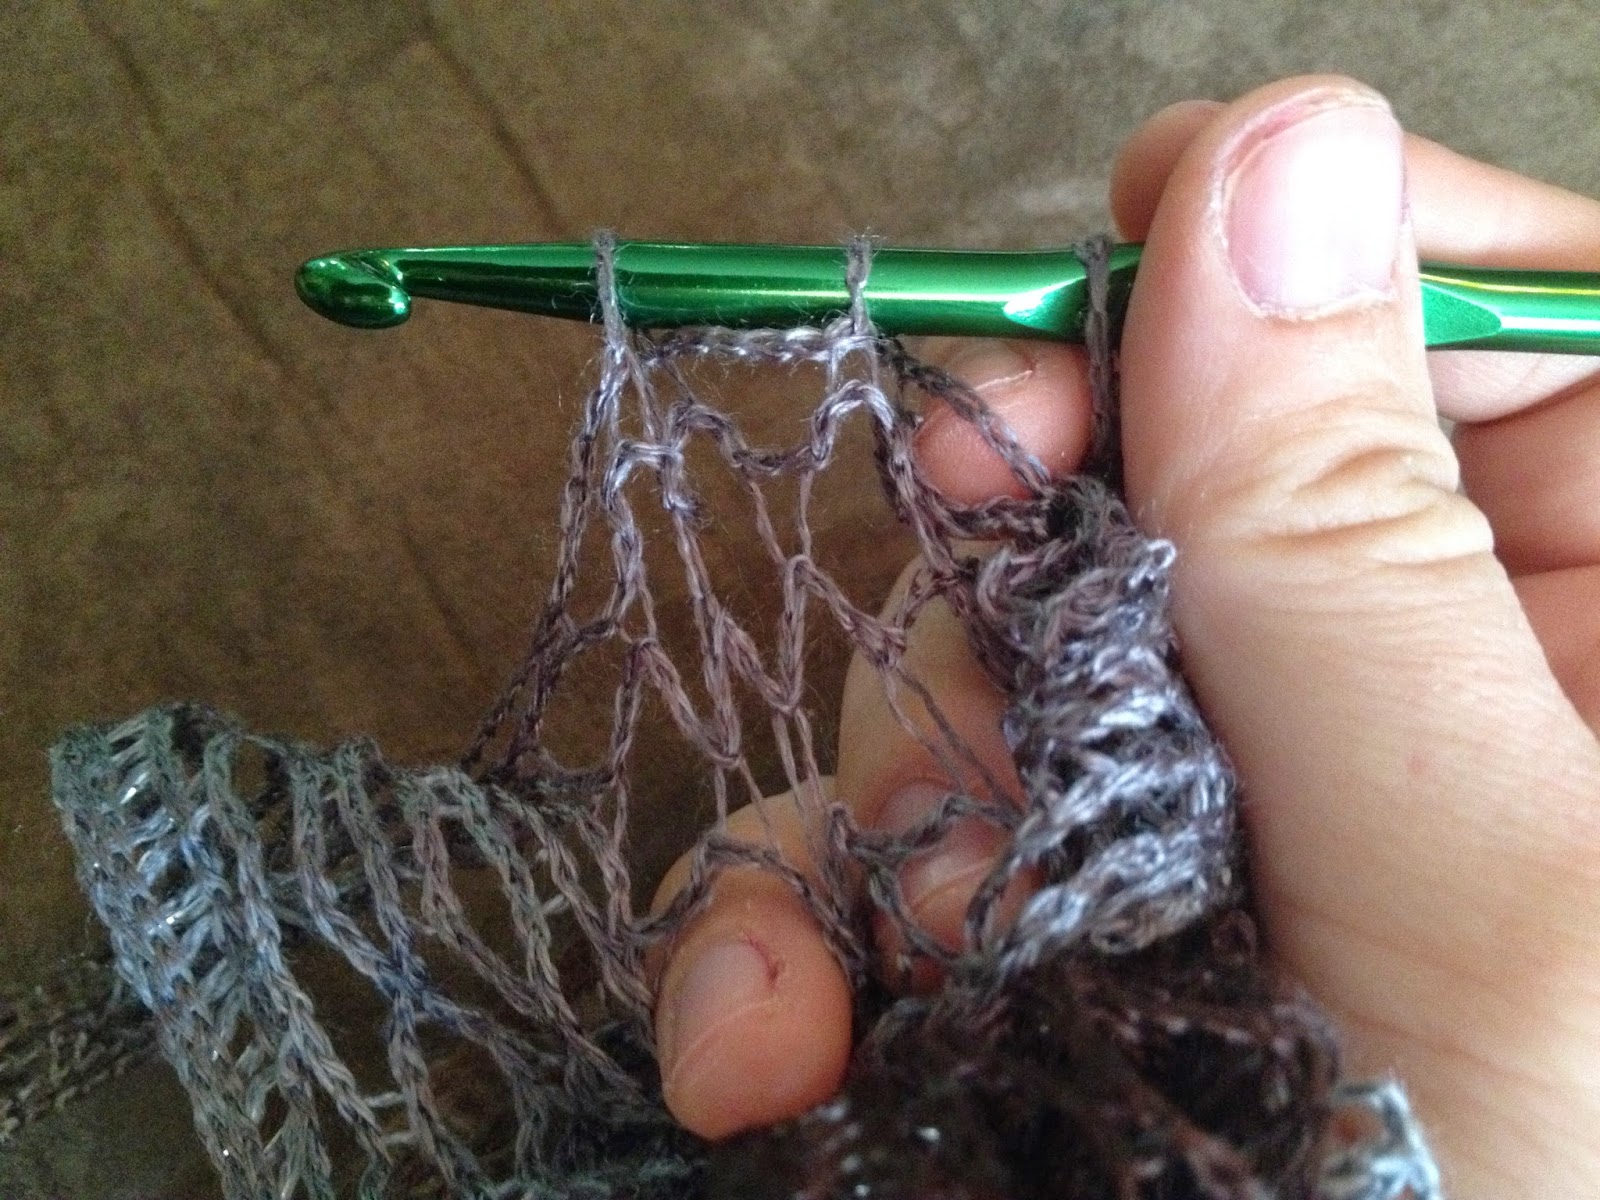
I used a size 'h'crochet hook.  If you spread the first part of the yarn out, you will notice that the two sides are different. You will want to work in the side that is more open...has holes for you to work in.


You are going to run your crochet hook through every other hole/space until you have cast on 10.   In the picture below you can see my crochet hook going through every other space.


After you have cast on 10, you will gather all except the one closest to the hook, and pull the single strand through the group.


Stitch markers were suggested in at least one of the tutorials I looked at, but I chose not to use them, and had no problem.  I believe they were suggested so that the whole scarf would not unravel or you would not lose your place if you had a mishap and dropped the stitches you were currently working on.

Now, I do not claim to be a super knowledgeable crafter/crocheter.  So, if something I have said does not make sense, please comment below or message me and I will do my best to help you out!  

Enjoy your new 'frilly' scarf!!!

Friday, September 26, 2014

DIY Microwave Popcorn

I don't know about ya'll, but I LOVE popcorn!! The more butter and salt the better!  (Not better for you....but it sure does taste good!)  Last night I decided I would like some popcorn...but, I didn't have any microwave popcorn.  I do have an air popper, but I was being lazy and didn't feel like pulling it out.  So, I decided to try the DIY microwave popcorn I had seen on Pinterest!  It was good!  I did learn a couple things to make it better next time though!


The tutorials I read each said to put 1/4 c. popcorn kernels in a glass bowl.  I used the 1.5 quart, and it was much too small...  I would probably use my largest glass mixing bowl.  It also said to put a ceramic plate on top...that was no problem, unless you don't have one big enough for your bowl.

The tutorials also said to pop the popcorn about 3 minutes...that was not long enough for mine.  I'm sure all microwaves are different though and the time will vary from person to person.  I let mine go for about 4 minutes and my popcorn kernels were not all popped.  However, my bowl was full!

The healthiest way to eat the popcorn would be plain...but, I don't always go for the healthiest (even though I do try to usually).  I like to melt a chunk of real butter in a bowl with some olive oil and drizzle the mixture over the popped popcorn and then add some salt!

My snack was absolutely delicious!!  Let me know if you try it and if you like it!!

Thursday, September 4, 2014

Easy Iced Coffee!!


Ever since college I have been a coffee drinker.  Probably more so when I am teaching.  However, I prefer decaf.  I also drink it for several reasons.  One reason is that it keeps me from snacking.  Another reason is that it is relaxing to drink a nice warm cup of coffee while sitting on the couch after everyone else is in bed!   It also is the perfect drink to accompany anything sweet, such as ice cream!

I have been wanting to perfect my iced coffee drink since college.  I do my best to pinch every penny possible...so I don't keep the air on 68 (much to my husbands dismay) in the summer.  Therefore, drinking hot coffee is not always what I want in the heat of summer...I still want the taste though!  So, after trying many different ideas and recipes I have finally made a simple,delicious, and easy iced coffee!!

You will need:

Coffee Pot
1 pkg sample coffee (like at Wal-Mart, those little bitty bags)
Ice trays
Milk
Sweetener (I used one pkg truvia per cup)
Chocolate/Caramel if desired
Flavored Creamer if desired (I love the Chocolate Caramel from International Delight)

I made a 12 cup pot of coffee using a whole small pkg of coffee.  I chose to use a flavored coffee for this.  Then I poured this into the ice cub trays and placed them in the freezer overnight. (I got over 4 dozen ice cubes).  The next day I dumped all the cubes out of the trays and into a freezer bag for storage.

To make each drink you simply make a cup of coffee as you usually would.  Add about 1/2 c milk (I use skim), 1 pkg sweetener (truvia),  4 to 6 coffee cubes, and flavor with chocolate/caramel if desired!  
Enjoy!!

**Also if you like that cup - check out some more Tervis Tumblers!! They are my favorite cups to use! they are microwave and dishwasher safe, keep hot drinks hot, cold drinks cold and don't sweat!!**

Friday, August 8, 2014

Diaper Box Makeover - Pinterest Project of the Week

Although I use cloth diapers when we are at home...I have chosen to use disposables when we are out and about, especially when we travel! Therefore, I have several diaper boxes.  I also am trying to organize my daughter's closet in a cute and inexpensive way.  Therefore, I saw a great idea on Pinterest about covering diaper boxes. The idea that I read mentioned using contact paper or sticky shelf paper.  When I went shopping the cheapest I could find was approximately $6 + tax, and, it was partially see-through.  So, as I was walking through the store, I found a large display of very cute duck tape!  Voila!  I actually bought 2 rolls ($3 each) because I had other projects that needed duck tape!

This project used less than one roll of duck tape (I probably could cover 2 boxes with just one roll).  I was beyond excited about how my project turned out!!  Check out the pictures below and let me know what you think!


I began with one diaper box...


Use scissors or a box cutter to remove the top flaps (I think using a box cutter is much easier!)...


I then began placing the duck tape (I alternated my two designs just for fun!)


The finished product is now in my daughter's closet holding all kinds of wonderful things!!  Seriously! This was so much cheaper than purchasing storage cubes!  I could easily have done 2 boxes from one roll of duck tape and possibly had a little left over!!  Yay for super Pinterest project!!

Let me know what method you try and how it worked out for you!


Tuesday, February 18, 2014

DIY Laundry Stain Remover

So, my beautiful little distraction tends to create stains on her cute little pink clothes!  And since little girls look much cuter in clean clothes, I had to find a great stain remover!  My Mom told me about a home made stain remover that she had found and tried and how wonderfully it worked!  It got out a stain that had been in a sweater for years!  So, I decided to try it, and I love it!  This is my second batch...

You will need:

Dish Detergent (I used Dawn)
Hydrogen Peroxide
Baking Soda
Small Container (I use a small canning jar)


Mix all ingredients in container and you are done!  How easy was that?  As the mixture sits the baking soda does seem to settle to the bottom.  I use a small spatula to stir the mixture before each use and then to apply it to the stained clothes.  I just keep the stain remover and the spatula right beside the washer!  I hope this works as well for you as it has for me!


Wednesday, February 12, 2014

DIY Liquid Laundry Detergent

So, I had hoped to post this much sooner! However, I currently have a very cute distraction:


So, I am finally getting around to re-posting this with more details and pictures!  I have been using homemade laundry detergent for a couple years now and I absolutely love it!!  This recipe will make 10 gallons (the 5-gallon bucket is double concentrate that you will mix with water as you use it).  I could not even tell you the money we have saved by using this as opposed to purchasing detergent!

You will need:
          - 5 gallon bucket (with lid)
          - 1 bar of soap (Fels Naptha, Ivory, Castille...)
          - Arm & Hammer Super Washing Soda
          - Borax


You will need about 2 cups of water in a medium sauce pan, on medium heat.  
Grate your bar of soap into the saucepan of water.


Stir until the soap is completely melted.


I usually place my 5 gallon bucket in the bathtub.  I also measure my Washing Powder and Borax ahead of time and place them in a small container.  After the soap is dissolved in the water, pour the soap mixture into your 5 gallon bucket. Add your Washing Powder and Borax.  Stir until the dry mixture is completely dissolved.


Fill the bucket with water and let sit overnight.


It's consistency will turn to a gelatin like consistency, with some liquid around the edges.  When you are ready to use it, simply fill a laundry detergent container half way with the homemade mixture and then finish filling the container with water. Shake well and use just like you would your regular detergent!

**If you want, you can add some essential oils for a nice scent**

I hope that this has been helpful!!! Please feel free to comment below!


Monday, November 18, 2013

Taco Bites

Sunday night was a devotion followed by a fellowship meal at our church.  My sweetheart wanted to take something including deer meat (since he recently got a beautiful 9-pointer with his bow).  I had seen Taco Bites on Pinterest, but I had not (and still haven't) taken the time to read the recipe...So, I made my own as I went.  Apparently they were good because my dish came home empty!

I started my fresh deer meat.  I love to begin with some olive oil and fresh garlic before I add the ground meat.  After the meat was completely cooked (browned) I added my home-made taco seasoning!  After I add the seasoning I let the meat continue to cook on low for a few minutes.  While the meat is cooking I prepared some refried beans. In the interest of time, I opened a can and added 2T water, and heated them for about 1 minute.

Lightly spray your pans.  Line with tortilla shell.  I have made these myself...and oh my - so delicious! However, as I mentioned earlier - in the interest of time, I chose to use store bought.  I purchased the small size and cut them into quarters.


 Next, I added a small spoonful of refried beans.


On top of the refried beans I added a small spoon of the seasoned meat, and sprinkled with a mixture of mozzarella and cheddar cheeses.  


I then repeated the first three steps.  This makes two layers of tortilla shell, beans, meat, and cheese.

Bake at 325 for about 15-20 minutes and....


They smelled so delicious!  Everyone seemed to enjoy them.  I would serve them with a bowl of salsa and a bowl of sour cream.  That way people can customize them for their own preferences!  

Enjoy!

Thursday, November 7, 2013

Let's Try This Again...

So, in my last post, I stated that I would be blogging again....which I truly had every intention of doing.  However, my computer had other intentions! :)  Don't you just love technology some days?  Anyhow, the computer is once again in a cooperative mood and this time, I am back! :)  I have several things lined up to blog about over the next week or so including a recipe or two, some home remodeling, and of course something crafty! So, please, don't give up on me! 

I look forward to sharing with you soon!!

~