Showing posts with label Cheap. Show all posts

Thursday, September 4, 2014

Easy Iced Coffee!!


Ever since college I have been a coffee drinker.  Probably more so when I am teaching.  However, I prefer decaf.  I also drink it for several reasons.  One reason is that it keeps me from snacking.  Another reason is that it is relaxing to drink a nice warm cup of coffee while sitting on the couch after everyone else is in bed!   It also is the perfect drink to accompany anything sweet, such as ice cream!

I have been wanting to perfect my iced coffee drink since college.  I do my best to pinch every penny possible...so I don't keep the air on 68 (much to my husbands dismay) in the summer.  Therefore, drinking hot coffee is not always what I want in the heat of summer...I still want the taste though!  So, after trying many different ideas and recipes I have finally made a simple,delicious, and easy iced coffee!!

You will need:

Coffee Pot
1 pkg sample coffee (like at Wal-Mart, those little bitty bags)
Ice trays
Milk
Sweetener (I used one pkg truvia per cup)
Chocolate/Caramel if desired
Flavored Creamer if desired (I love the Chocolate Caramel from International Delight)

I made a 12 cup pot of coffee using a whole small pkg of coffee.  I chose to use a flavored coffee for this.  Then I poured this into the ice cub trays and placed them in the freezer overnight. (I got over 4 dozen ice cubes).  The next day I dumped all the cubes out of the trays and into a freezer bag for storage.

To make each drink you simply make a cup of coffee as you usually would.  Add about 1/2 c milk (I use skim), 1 pkg sweetener (truvia),  4 to 6 coffee cubes, and flavor with chocolate/caramel if desired!  
Enjoy!!

**Also if you like that cup - check out some more Tervis Tumblers!! They are my favorite cups to use! they are microwave and dishwasher safe, keep hot drinks hot, cold drinks cold and don't sweat!!**

Friday, August 8, 2014

Diaper Box Makeover - Pinterest Project of the Week

Although I use cloth diapers when we are at home...I have chosen to use disposables when we are out and about, especially when we travel! Therefore, I have several diaper boxes.  I also am trying to organize my daughter's closet in a cute and inexpensive way.  Therefore, I saw a great idea on Pinterest about covering diaper boxes. The idea that I read mentioned using contact paper or sticky shelf paper.  When I went shopping the cheapest I could find was approximately $6 + tax, and, it was partially see-through.  So, as I was walking through the store, I found a large display of very cute duck tape!  Voila!  I actually bought 2 rolls ($3 each) because I had other projects that needed duck tape!

This project used less than one roll of duck tape (I probably could cover 2 boxes with just one roll).  I was beyond excited about how my project turned out!!  Check out the pictures below and let me know what you think!


I began with one diaper box...


Use scissors or a box cutter to remove the top flaps (I think using a box cutter is much easier!)...


I then began placing the duck tape (I alternated my two designs just for fun!)


The finished product is now in my daughter's closet holding all kinds of wonderful things!!  Seriously! This was so much cheaper than purchasing storage cubes!  I could easily have done 2 boxes from one roll of duck tape and possibly had a little left over!!  Yay for super Pinterest project!!

Let me know what method you try and how it worked out for you!


Wednesday, February 12, 2014

DIY Liquid Laundry Detergent

So, I had hoped to post this much sooner! However, I currently have a very cute distraction:


So, I am finally getting around to re-posting this with more details and pictures!  I have been using homemade laundry detergent for a couple years now and I absolutely love it!!  This recipe will make 10 gallons (the 5-gallon bucket is double concentrate that you will mix with water as you use it).  I could not even tell you the money we have saved by using this as opposed to purchasing detergent!

You will need:
          - 5 gallon bucket (with lid)
          - 1 bar of soap (Fels Naptha, Ivory, Castille...)
          - Arm & Hammer Super Washing Soda
          - Borax


You will need about 2 cups of water in a medium sauce pan, on medium heat.  
Grate your bar of soap into the saucepan of water.


Stir until the soap is completely melted.


I usually place my 5 gallon bucket in the bathtub.  I also measure my Washing Powder and Borax ahead of time and place them in a small container.  After the soap is dissolved in the water, pour the soap mixture into your 5 gallon bucket. Add your Washing Powder and Borax.  Stir until the dry mixture is completely dissolved.


Fill the bucket with water and let sit overnight.


It's consistency will turn to a gelatin like consistency, with some liquid around the edges.  When you are ready to use it, simply fill a laundry detergent container half way with the homemade mixture and then finish filling the container with water. Shake well and use just like you would your regular detergent!

**If you want, you can add some essential oils for a nice scent**

I hope that this has been helpful!!! Please feel free to comment below!


Thursday, December 27, 2012

Laundry Shelf


I am all about organization!!!  I also hate it when things fall behind the washer or dryer...because then I have to pull them away from the wall.  Which means I will end up vacuuming and mopping behind them...  Now, it is a good idea to clean behind the washer and dryer, but I try to plan these things for a day when I am off work, or do not have ten places to be!  :)  So, I saw on Pinterest the idea to put a shelf over the back of the washer and dryer.  I loved it!!  Now, I'm sure you will notice that my washer and dryer do not match...but, they came with the house, and I will not complain about appliances I did not have to buy!  So, I asked my sweet Mountain Man husband to dig through his extra wood, and we found a board that would work.  So, I found some stain that was close to my cabinets and I stained it - so easy!! Then, we pulled out the washer and dryer (and I swept and mopped) and we hung the shelf!!  It is definitely one of my favorite additions to our laundry 'hall'!  It took a total of about 3 days - I was only able to work on this after work.  Day one I did one coat of stain, Day 2 I did a second coat of stain, and Day 3 we hung the shelf!!  It is wonderful!  )We did make a small cut out so that we could still get to the outlet just behind the washer!)

 
Have you made any additions to your laundry room?  What would you change if you could?

Tuesday, August 7, 2012

Attn: Couponers!!

So, I was going through Wal-Mart this afternoon on a quick trip to get some things for school and ran across a clearance section in Office Supplies. I love Office Supplies!!  I noticed the Pop Up tape things were on clearance...I didn't get any, just noticed.

Then, after working in my classroom today, I went back to Wal-Mart (with my coupon book) to get groceries).  I had failed to research the sales, so I pulled my little Wal-Mart cart into a corner to browse through my coupons real quick and pulled a few I wanted to check on...as I was doing that I came across $1 off Pop Up Tape...hmmm.... So, after grabbing some free razors, cheap feminine products, and energy bars I headed back to office supplies...

 Sure enough, I saw:

Pop-Up Tape refill:  $0.75!!

Do the math? 

That's right!!

(Don't know how to turn this the right way...)

I made $0.25 for each one!!!  Woohoo!! I was so excited! I love to use this when wrapping gifts, but rarely buy it because regular tape is cheaper, and I prefer to take the cheapest (but still nice) way possible.


I did notice that a couple aisles over the same thing was listed at $1.97, but I double checked with the Wal-Mart person working that section, and they were truly $0.75.  So, find your coupon and go check your Wal-Mart!!


Thursday, August 2, 2012

Pinterest Project of the Day - Day 17

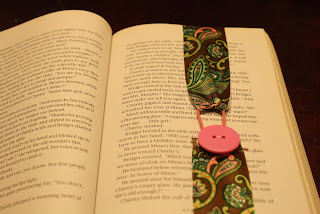
Today, I had a fun and busy day!!  I spent part of the day at Opry Mills with my family! That was the first time I have been since the flood - the mall looked very nice!  Before I left I finished crocheting all the flowers for an order of hair bows.  This evening, I put the hair bows together and also completed today's project!!  I decided to try and make one of those 'stay-put' bookmarks.  It was SO simple and very quick.  If you do not have any of the supplies on hand you can make this for less than $7 (and you will have enough materials to make more than one).  I didn't even get out the sewing machine for this! I simply hand sewed one end of the ribbon around a small hair tie, then folded over the edge of the other end and sewed it and added the button.  It was perfect!!  Usually the button side would go on the outside of the book, but for the sake of the picture you will see my bookmark on the inside!


Of course, if you don't want to make one, I'll be glad to do it for you!  Simply message me for details!

Saturday, July 28, 2012

Pinterest Project of the Day - Day 14

Yesterday I spent the day in a minivan with my sister-n-law and her three children...so...didn't really do much of a project! :)  However, any day spent with family is wonderful!!  So, I thought I would show ya'll an old project that I did and had on back-up for such situations!  I have already talked about my closet and the pegboard to hang my purses (thanks Dad and Stephen).  I had been trouble storing my 'cute' winter boots and saw the neatest idea on Pinterest.   You take those foam pool noodles and cut them to size and stick them down in your boots.  So, I went to get some pool noodles...and could not find them!!!  But finally, after girls night with my best friend we were seeking shelter from a storm in Kroger and there were my pool noodles...ON SALE!!  Woohoo!!  I bought three, but only used two, and here is the finished product!  I am so pleased with this project, and it was SO easy!!


Put the pool noodle  in your boot
Mark the desired height with a marker
Cut with regular scissors

Monday, July 9, 2012

Pinterest Project of the Day - Day 2

I am all about doing things that can save money!  I also love to do things 'home-made'.  I don't go as far as some do, but I do try to do as much as I can to make my own products and do it the cheap way! I also have always been a huge fan of dishwashers!!  As I would help my Mom with dishes at home I always told her that when I got my own house I only wanted 'dishwasher safe' items.  While, not every item in my kitchen now is dishwasher safe, the majority of my items are! Because I love to cook, and try to make everything I can from scratch, I generally mess up quite a few dishes when I go to cook dinner. Therefore, I run my dishwasher every couple days at least (and I'm sure that will increase as we have children!).  Dishwasher tabs are quite expensive and that expense was just not fitting into my weekly Wal-Mart grocery and household needs budget.  So, a friend of mine had tried making dishwasher detergent from a recipe found on Pinterest and they truly liked it!  Well, I got on Pinterest and found quite a few recipes for dishwasher detergent.  Some made huge batches, some made small batches, some required lemon Kool-Aid (which would stain your dishwasher after a few uses).  After ready many many recipes, I finally found one I wanted to try!  So, I mixed up a batch and of course, just happened to have a dishwasher full of dirty dishes to try it on!  I have to say, I like it!!    Below is a picture of my detergent and the recipe I used to make it!  I also used vinegar as the rinsing agent (in that little spot in the dishwasher door!).  Good Luck and enjoy!!


2 cups of Borax
2 cups of Baking Soda
 4 tablespoons of citric acid--can be found near canning items
White Vinegar

Mix everything together by either dumping into a big bowl and stirring it really well or dumping it into a container with a lid and shaking it up. You can keep it in your lidded container or re-use your old detergent box, or a jar.

I use about 1 1/2 tablespoons per load. (3/4 tablespoon in the open cup and 3/4 in the closed locking cup)  I have heard that if you have hard water, you can adjust the amount of Borax, or add salt to the detergent mixture

Monday, March 5, 2012

Update on the Dryer Sheets...

WOW!  So, I have learned that my plan for making my own dryer sheets did not work out quite as well as I had hoped.....they got moldy.  Very sad day!  So, Plan B!

Make home made fabric softener, as mentioned in previous post.  Put in a spray bottle (you can buy these for $1  or less at Wal-Mart or the Dollar Store).  Keep dry rags in a container.  When you are ready to put a load of laundry in the dryer, gently shake the spray bottle of fabric softener and spritz the rag before tossing in the dryer!

Hope this helps!